The source code for this article can be found here.
Welcome to another cloud experiment! The idea behind these hands-on tutorials is to provide practical experience building cloud-native solutions of different sizes using AWS services and CDK. We’ll focus on developing expertise in Infrastructure as Code, AWS services, and cloud architecture while understanding both the “how” and “why” behind our choices.
Using Resources Just When You Need Them
Most tech teams nowadays are wise enough to avoid testing features and bug fixes in production but only if there’s a chance management will catch them. Instead, we split our deployments into production, staging, and development environments, using a rigorous workflow to ensure only mature code makes it to our production servers.
This, of course, can become costly as the size of the system and the number of instances/resources for each environment keeps growing. We usually employ some techniques to limit the costs, like reserving the use of beefy instances only for production environments, and running staging/development loads on their cheaper, less-powerful cousins.
These running instances still cost money, so we want to ensure they are running only when people will use them, which means (hopefully) from Monday through Friday during work hours. We are going to design a little solution for solving this problem and saving a bunch of money and, while we are at it, take note to bring up these numbers in the next salary negotiation talk.
Designing an Automated Mechanism for Starting and Stopping Instances
Staging and Development instances, in many places, are used almost exclusively during work hours, from 9:00 to 17:00.
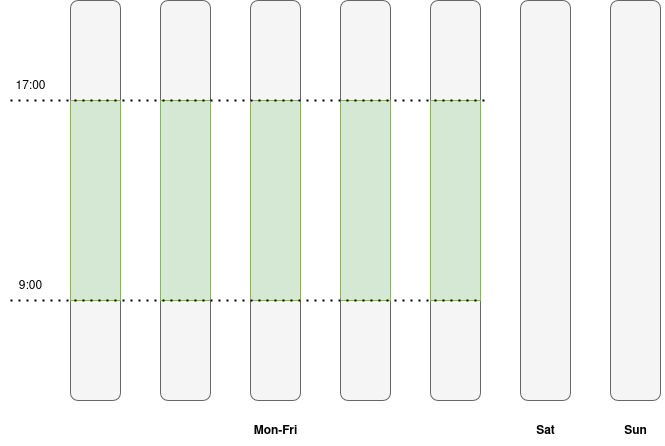
We can ensure that machines are running only when they are needed with only 10 state transitions per week:
- Start the instances on Monday at 9:00
- Stop the instances on Monday at 17:00
- Start the instances on Tuesday at 9:00
- Stop the instances on Tuesday at 17:00
- Start the instances on Wednesday at 9:00
- Stop the instances on Wednesday at 17:00
- Start the instances on Thursday at 9:00
- Stop the instances on Thursday at 17:00
- Start the instances on Friday at 9:00
- Stop the instances on Friday at 17:00
Because the actions are periodic, we can achieve this by using EventBridge Scheduler events, Lambda functions, and the AWS SDK. The simplest solution is to use two scheduler rules (one for starting, one for stopping) and associate each of them with a Lambda Function (one for starting, one for stopping).
We are going to do something slightly more interesting:
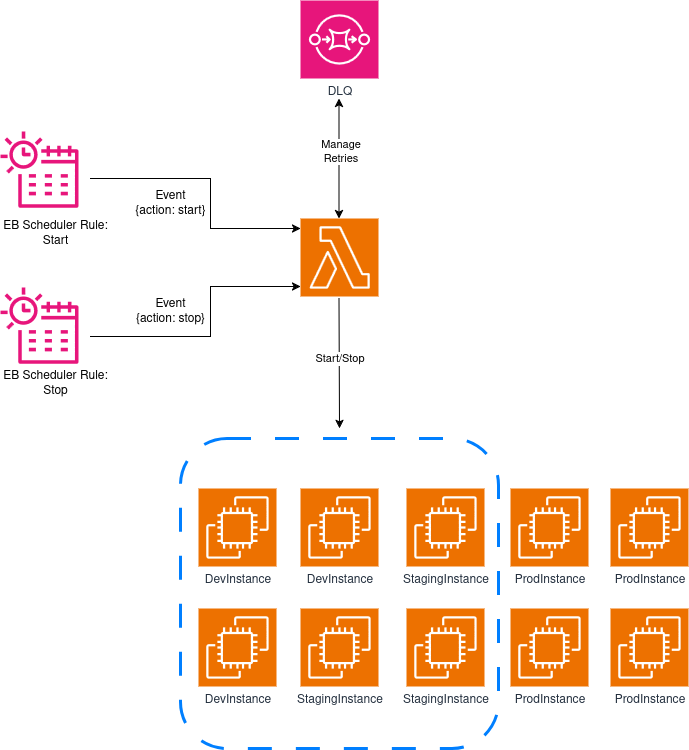
- We will keep the two scheduler rules, but we will add a little piece of data to the events they emit to control the behavior of the Lambda function. We will configure a dead letter queue to enable event retries in case they fail.
- The main idea is to learn how to use event data provided by each event to trigger different behaviors in the same Lambda function.
- Our Lambda function will receive the events, figure out which type of action it’s meant to take, and then either start or stop every staging and development EC2 instance in our system.
If we pull this off, developers will find their staging and development instances ready and waiting when they arrive each morning, while we save ~76% on running costs by shutting everything down outside of work hours.
Oh, one quick thing before moving on.
How Will the Lambda Function Know Which Instances Are Staging and Development, and Which Ones Are Production?
Getting this wrong can be really, really costly; we do not want to stop production instances and leave customers without access to the system.
So, how does the Lambda know? Easy, we are incredibly thorough and foresightful (is this a real word?), and have done a great job at tagging each resource in the system so that we know which environment they belong to.
Each EC2 instance has an Environment tag that can have the value of development, staging, or production. The Lambda function will use this information for deciding which instances it should target.
Two Real-World Notes
- In a professional setting, it’s unlikely you will have production, staging, and development instances running next to each other. A proper setup involves using AWS Organizations and creating accounts dedicated to resources for each environment, so you can isolate them and better keep track of their usage and cost.
- AWS already has a well-documented solution for this issue. You can find the official approach for instance scheduling here. It is probably more complex than what you usually need, but it’s worth studying how they achieve this (and quite a lot more) with simple components.
Creating Our Project
Same old standard procedure: First, we just need to create an empty folder (I named mine AutoEC2InstanceStartStop) and run cdk init app --language typescript inside it.
This next change is totally optional, but the first thing I do after creating a new CDK project is head into the bin folder and rename the app file to main.ts. Then I open the cdk.json file and edit the app config like this:
{
  "app": "npx ts-node --prefer-ts-exts bin/main.ts",
  "watch": {
    ...
  }
}
Now your project will recognize main.ts as the main application file. You don’t have to do this—I just like having a file named main serving as the main app file.
Creating the Lambda Function
The Lambda function is the core piece of the solution, so let’s start with it. Create a folder called lambdas at the project’s root level (alongside bin and lib), and within it create instance_start_stop.rb:
require 'aws-sdk-ec2'

EC2 = Aws::EC2::Resource.new

def handler(event:, context:)
  action = event['action']

  unless ['start', 'stop'].include?(action)
    raise "Invalid action: #{action}"
  end

  tag_filter = { name: 'tag:Environment', values: ["development", "staging"] }

  case action
  when 'start'
    EC2.instances(filters: [tag_filter, { name: 'instance-state-name', values: ['stopped'] }])
       .each(&:start)
  when 'stop'
    EC2.instances(filters: [tag_filter, { name: 'instance-state-name', values: ['running'] }])
       .each(&:stop)
  end

end
Let’s go step-by-step:
- The function imports its only dependency,
aws-sdk-ec2, and instantiates a resource-type EC2 client. Not all services support resources, but they make interacting with the AWS API a breeze, so use them whenever you get the chance. - The handler of our function retrieves the
actionvalue from the event it receives, then it checks whether it’s one of the two supported values:startorstop. If for some reason the event’s action is none of those two values, it will raise an exception. - We create a filter that we will use later in the retrieval process—it targets the
Environmenttag, and attempts to retrieve all instances where the value of this tag is eitherdevelopmentorstaging. - Next, based on the value of action (start or stop), we will perform a call to the
instancesfunction with the filter we wrote before, and a new filter that targets the state of the instance. When we aim to start instances, we just care about those that are in thestoppedstate, and when we aim to stop the instances, we just care about the ones in therunningstate. We don’t want to waste API calls on trying to shut down a machine that is already offline, or starting a machine that is already in a running state. - After we retrieve the list of machines, we iterate calling either the
startmethod or thestopmethod—this results in an API call that triggers the right state transition on each machine.
It’s a very simple function, but it gets the job done well enough. Now it’s time to build our stack.
Building the Stack
From looking at the diagram, we know we’ll need the following imports at the top of the stack:
import * as cdk from 'aws-cdk-lib';
import {Construct} from 'constructs';
import {aws_events as events} from 'aws-cdk-lib';
import {aws_events_targets as event_targets} from 'aws-cdk-lib';
import {aws_lambda as lambda} from 'aws-cdk-lib';
import {aws_sqs as sqs} from 'aws-cdk-lib';
import {aws_iam as iam} from 'aws-cdk-lib';
The first resources we need to create are the queue we will use as DLQ, and our Lambda function:
const dlq = new sqs.Queue(this, 'deadLetterQueue');

const startStopFunction = new lambda.Function(this, 'startStopFunction', {
    runtime: lambda.Runtime.RUBY_3_4,
    code: lambda.Code.fromAsset('lambdas'),
    handler: 'instance_start_stop.handler',
    description: 'Starts and stops an EC2 instance',
});
Now, we just need to define the two schedules and we will be almost done. Let’s first create them and then discuss how they achieve our goal:
const startSchedule = new events.Rule(this, 'startSchedule', {
    schedule: events.Schedule.cron({weekDay: 'MON-FRI', hour: '7', minute: '0'}),
    targets: [new event_targets.LambdaFunction(startStopFunction, {
        deadLetterQueue: dlq,
        maxEventAge: cdk.Duration.minutes(5),
        retryAttempts: 2,
        event: events.RuleTargetInput.fromObject({action: 'start'}),
    })]
});

const stopSchedule = new events.Rule(this, 'stopSchedule', {
    schedule: events.Schedule.cron({weekDay: 'MON-FRI', hour: '15', minute: '0'}),
    targets: [new event_targets.LambdaFunction(startStopFunction, {
        deadLetterQueue: dlq,
        maxEventAge: cdk.Duration.minutes(5),
        retryAttempts: 2,
        event: events.RuleTargetInput.fromObject({action: 'stop'}),
    })]
});
- Each event receives a
scheduleprop to specify when they are meant to run. In a previous lab we used a rule for emitting an event every 30 minutes, so we passed araterule like this one:schedule: events.Schedule.rate(cdk.Duration.minutes(30)). This time we need to execute actions at a given time each day, so we instead use acronrule that states that we will run them from Monday to Friday at a particular time. - Both functions target the same Lambda, and use the same retry configuration—nothing interesting in this part.
- Except for the
eventproperty! This part is very important, because it’s what defines the action the Lambda function is going to take. You can configure the contents of the event emitted by the rule in a variety of ways. In our case we just use thefromObjectmethod by passing a dictionary with the values we need for each case. After this,startSchedulewill emit events with the contents{action: 'start'}andstopSchedulewill emit one with the contents{action: 'stop'}. - Note that the times are in UTC. Because I live in a zone with CEST time, I needed to subtract 2 hours from the time where I wanted the events to be emitted, so 9:00 becomes 7:00 (UTC) and 17:00 becomes 15:00 (UTC).
Adding Permissions and Creating the Stack
Our Lambda needs a few permissions to be able to operate properly, as some of the methods we run call the AWS API under the hood:
- startStopFunction must be able to call ec2:DescribeInstances
- startStopFunction must be able to call ec2:StartInstances
- startStopFunction must be able to call ec2:StopInstances
In CDK, these permissions can be defined as:
const ec2ManagementPolicy = new iam.PolicyStatement({
    actions: ['ec2:DescribeInstances', 'ec2:StartInstances', 'ec2:StopInstances'],
    resources: ['*'],
});
startStopFunction.addToRolePolicy(ec2ManagementPolicy);
And we are done. Now we can go into main.ts and create our stack:
new AutoEc2InstanceStartStopStack(app, 'AutoEc2InstanceStartStopStack', {});
When you feel ready, go ahead deploy the solution by running cdk deploy.
Testing the Solution
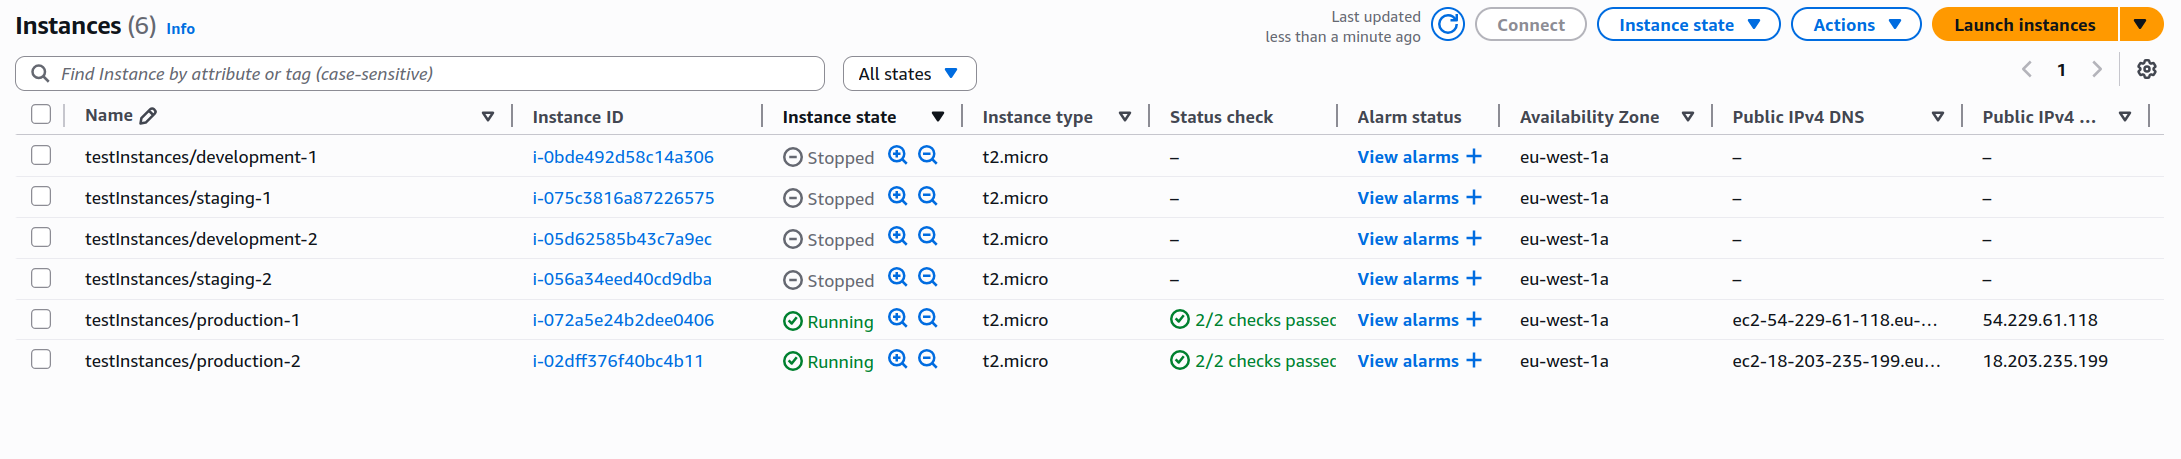
The next step is to manually create a few EC2 instances and add Environment tags for development, staging, and production.
If you are feeling extra lazy, don’t worry—I got your back. I went ahead and created another stack for adding tagged instances, just create another file in lib, I named mine ec2_test_instances-stack.ts:
import * as cdk from 'aws-cdk-lib';
import {Construct} from 'constructs';
import {aws_ec2 as ec2} from 'aws-cdk-lib';

interface Ec2TestInstancesStackProps extends cdk.StackProps {
    devInstanceNumber: number;
    stagingInstanceNumber: number;
    prodInstanceNumber: number;
}

export class Ec2TestInstancesStack extends cdk.Stack {

    constructor(scope: Construct, id: string, props: Ec2TestInstancesStackProps) {
        super(scope, id, props);

        const defaultVpc = ec2.Vpc.fromLookup(this, 'DefaultVpc', {isDefault: true});

        this.createTestInstances(props.devInstanceNumber, 'development', defaultVpc);
        this.createTestInstances(props.stagingInstanceNumber, 'staging', defaultVpc);
        this.createTestInstances(props.prodInstanceNumber, 'production', defaultVpc);
    }

    createTestInstances(numberOfInstances: number, environment: string, vpc: ec2.IVpc) {
        for (let index = 0; index < numberOfInstances; index++) {
            const instance = new ec2.Instance(this, `${environment}-${index + 1}`, {
                instanceType: ec2.InstanceType.of(ec2.InstanceClass.T2, ec2.InstanceSize.MICRO),
                machineImage: ec2.MachineImage.latestAmazonLinux2023(),
                vpc: vpc,
            });

            cdk.Tags.of(instance).add('Environment', environment);
        }
    }
}
Then, create this stack with 2 instances of each type:
new Ec2TestInstancesStack(app, 'testInstances', {
    env: {
        account: process.env.CDK_DEFAULT_ACCOUNT,
        region: process.env.CDK_DEFAULT_REGION,
    },
    devInstanceNumber: 2,
    stagingInstanceNumber: 2,
    prodInstanceNumber: 2,
});
And now, well, we just wait to see it in action!
If you don’t want to wait a bunch of time for testing the solution, you can edit your stack and schedule the events at a more convenient time, with a small window (10 minutes) between the emission of both events.
On the administration panel you can actually check the emission times for the next 10 events for each of our rules:
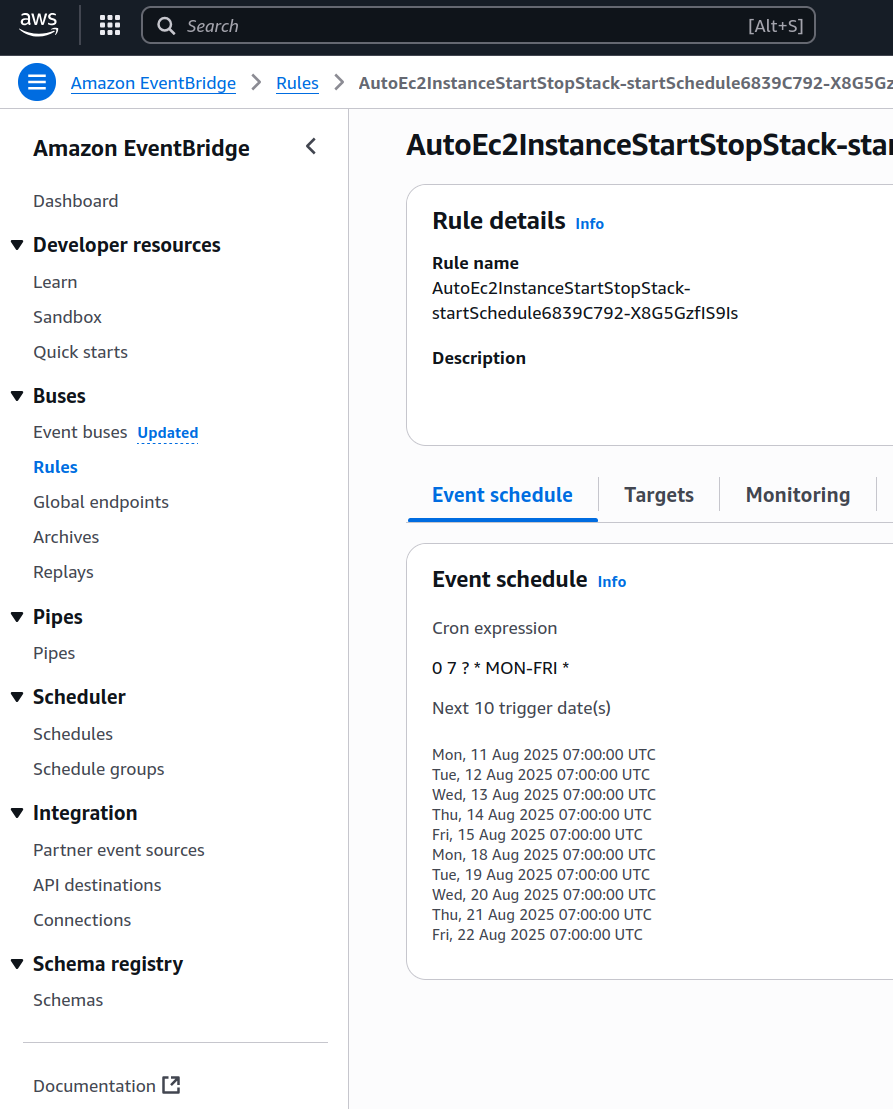
That’s it! Once we have verified the solution works as expected, we can pat ourselves on the back and feel the satisfaction of having completed another cloud experiment. Just remember to write down the amount of money you are saving every month and bring it up in the next salary talk with your manager—it will hopefully give you a lot more leverage.
IMPORTANT! Always remember to delete your stack by running cdk destroy or deleting it manually in the console.
Improvements and Experiments
- The AWS SDK supports batch operations for starting and stopping multiple instances in a single API call. Instead of making an API call to transition the state on each machine, modify the Lambda function to use one of these batch calls.
- Suppose you configured health checks for some of your instances and configured auto-scaling. What will happen when this solution starts shutting down machines? What would be the easiest way to fix this problem?
- We focused on EC2 instances, but you may have services deployed on ECS. How would you implement a similar behavior targeting containers running on ECS? Would it matter if they are EC2 deployments or Fargate deployments?
- Our Lambda function works well now, but we may want to develop the Start and Stop behaviors independently in the future. Re-architect the solution to use two Lambda functions instead of one, and update the events emitted by the Scheduler to account for this change.
- The Lambda function does not take several states into consideration, just
stoppedandrunning. Can this cause a problem in scenarios when instances are undergoing a state transition at the same time our Lambda is being executed? How bad a problem can it be?
This solution demonstrates how a few simple AWS components can come together to solve a real business problem that affects most development teams.
The beauty of this approach is its simplicity—we’re just using a small function with two scheduler rules to achieve our goals. EventBridge handles the scheduling, Lambda does the heavy lifting, and proper tagging ensures we don’t accidentally shut down anything important.
It’s the kind of solution that makes you look like a hero to your finance team while barely breaking a sweat, which isn’t bad for just a few lines of code.
I hope you find this useful!